|
ATX-8205 Technical Details |
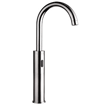
Tall swan neck design deck-mounted automatic sensor tap
- Features
- Technical Details
- Dimension
- Contents
- Functions
- Temperature Control
- Remote Control
Features
Tall and elegant 'Goose neck' design sensor tap
Swivel neck (360 degree)
Pillar-type frame construction with advance sensor eye
Hygienic and upto 70% water conservation
Powe Options: AC+DC Powered: Mains/4XAA Alkaline batteries (Up-to 2yr lifespan)
Mains/Battery Operated (Dual powered)
Hands free and reliable infrared activation technology
Exquisite and stylish 'goose neck' design
Solid brass construction
New control box design: ACB-0112
Compatible with FRC-613 Remote Control
Special Notes:Water pressure:
Water pressure range: 0.50 (Min) - 7 Bar (Max) (1 bar or above for best performance)
QUICK VISUAL DATA
 |
 |
 |
 |
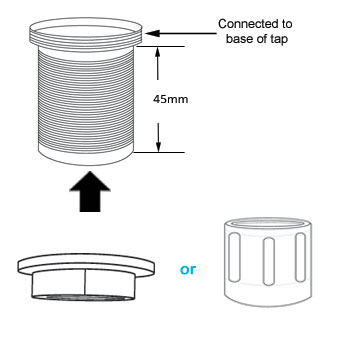
| This sensor tap can be powered by both Mains (AC) and Batteries (DC) | This sensor tap comes with a single water supply feed | 30-35mm | Control box for this sensor tap is supplied with detachable UK 'fused' plug |
TECHNICAL DETAILS
Control box: Diameter of 'inlet' pipe: G1/2”
Control box: Diameter of 'outlet' pipe: G1/2”
Water pressure range: 0.75 (Min) - 7 Bar (Max)
Voltage: DC6V or AC220V-240V (6V Output)
Power consumption: =0.3mW
Sensing distance: 6-24cm
Respond time: 1 Second
Battery Consumption (DC): 4xAA alkaline batteries (up-to 2yr lifespan depending on level of usage)
Silent Consumption: 0.003mW
Environment Temperature: 1-45 C
Flow Rate: 6L/Per minute
Pipe Threading: British Standard Whitworth (BSW)
Noise Class: 1
Finish: Chrome-plated
Voltage: DC6V or AC220V-240V (6V Output)
Power Options
DC = Direct Current (Battery source)
AC = Alternate Current (Mains electricity supply)
DC only: The tap can run off batteries only (4 x AA batteries)
We recommend using alkaline batteries, which should be new and of the same brand.
AC only: The tap can run off Mains power supply only.
A 'step-down' transformer is supplied,
type AC220V-240V (with 6V Output)
AC + DC: The tap can run off both AC (Mains) + DC (Batteries) connected at the same time.
This means, AC (Mains supply) will run the tap as normal, while the DC (batteries) ramains dormant, and acts as a backup power should the AC power fails.
TIP:
It's entirely up to you to decide which power option/combination suits your installation/usage the best.
The integrity of the tap stays the same.
DIMENSION:
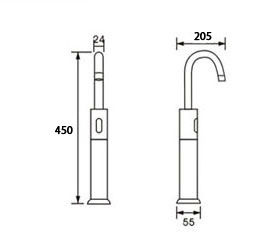

Fittings
CONTENTS
1x Sensor Tap
1x Control Box ***with 3-Pin plug (*battery compartment inside)
4x AA Alkaline Batteries (Subject to availability)
1x Flexible G1/2" *600mm Connection Hose
1x Transformer (*located inside control box)
Fittings and Screws
Nothing to display.
Water pressure:
Water pressure range: 0.7 (Min) - 8 Bar (Max) (1 bar or above for best performance)
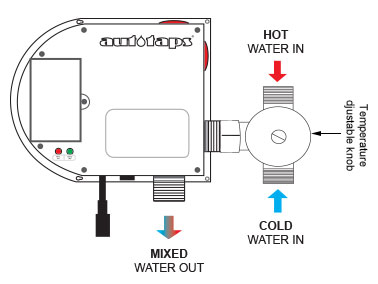
Temperature control:
This sensor tap is designed to be supplied with pre-mixed water.
Consideration should be given to safe hot water delivery and the use of an appropriate temperature reduction device.
See images below.
Manual blending valve:
ABV-0012
Water temperature is controlled manually.
Thermostatic mixer valves:
ATV-9004B
ATV-9004C
Water temperature is regulated automatically.
Frequently asked question:
Question:
What's difference between 'ATV-9004B' and 'ATV-9004C'?
Answer:
They're litterally both the same thing, except for only one difference.
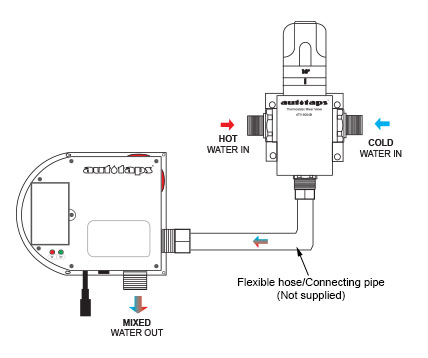
ATV-9004B has a 'wall-mounting' brackets attached to it, while ATV-9004C has a 'female' connection end, which can be connected directly to a control box 'inlet' as shown below.
|
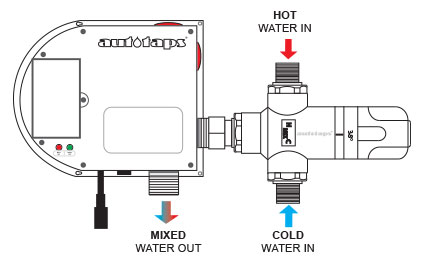
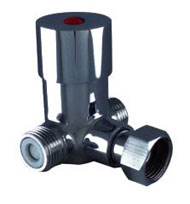
Option 1: ATV-9004C
This thermostat can be connected directly to the control box using its 1/2" female outlet connector. This method is usually the quickest way to setup installation. |
|
|
|
Option 4 : ABV-0012
This is a manual blending valve only, adjustable by hand. There's no thermostatic mixing element inside. Any desired temperature can only be achieved 'manually' by turning the knob clockwise or anti-clockwise by hand. |

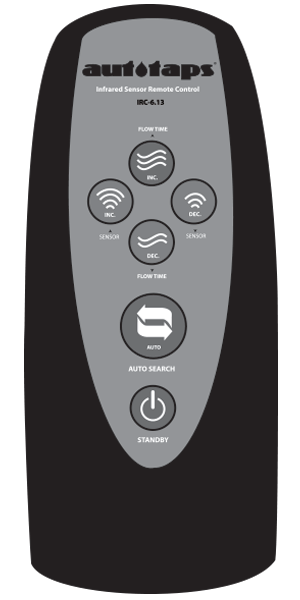
Infrared Remote Control: IRC-613
Sold separately |
 |
FLUSH/RUN Water: Flow Time Increase HOW TO: NOTE: |
 |
FLUSH/RUN Water: Flow Time Decrease HOW TO: NOTE: |
|
|
Increase Sensor Distance HOW TO: *Sensor distance range scope is around/between 7cm-35cm |
|
|
Decrease Sensor Distance HOW TO: *Sensor distance range scope is around/between 7cm-35cm |
|
|
Auto Search |
|
 |
Standby To disable, press once, LED light comes on and stays on for 2-3 seconds ‘twice’ and then goes off. Standby mode is now disabled. |