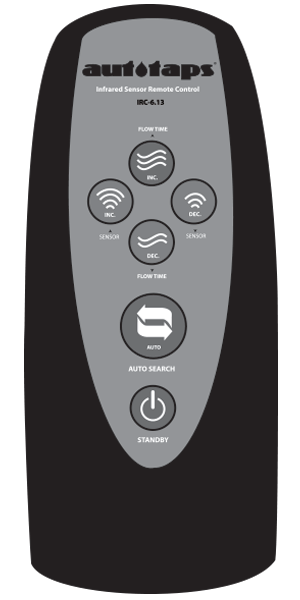
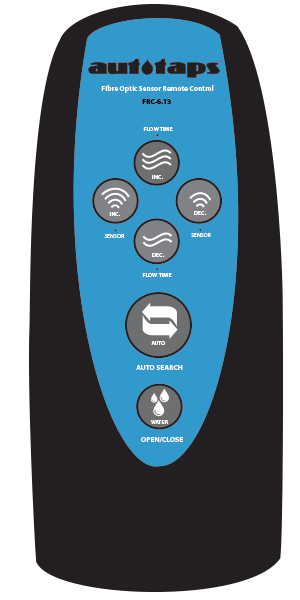
At Autotaps, we recognise that sensor taps are installed in different environment and catered for different applications. So it’s paramount for end-users to be able to customize and change settings to suit their needs. Autotaps SR6-13 6-keys remote control (sold separately) allows end-users/engineers to adjust/customize various settings relating to a ‘compatible’ sensor tap from its default factory settings. This adds added convenience and usability to give better customer experience.
 |
FLUSH/RUN Water: Flow Time Increase
When this button is pressed once, it will increase water flush/flow time by ‘5 seconds’. Each key press represents 5 seconds ‘flow time’ increment.
HOW TO:
With remote control facing/pointing towards the sensor, press once, a solid LED light comes on first and briefly followed by 3 LED light flashes. Each key press increases water flow time by 5s. For example, press 1 time =5s, press 2 times= 10s, 3 times= 15s etc.
NOTE:
Each key press must be registered by sensor module first before setting another parameter. For example, if you want the tap to run for 10 seconds, press this key once and let it register (which equals 5s) and press it again the second time to increase it from 5s to 10s and so on. |
 |
FLUSH/RUN Water: Flow Time Decrease
When this button is pressed once, it will decrease water flush/flow time by ‘5 seconds’. Each key press represents 5 seconds ‘flow time’ decrement.
HOW TO:
With remote control facing/pointing towards the sensor, press once, LED light flashes 3 times. Each key press will decreases water flow time by 5s. For example, press 1 time =-5s, press 2 times= -10s, 3 times= -15s etc.
NOTE:
Each key press must be registered by sensor module first before setting another parameter. For example, if you want the flow time to be decreased by 10 seconds, press this key once and let it register (which equals -5s) and press it again the second time to decrease it from 10s to 5s and so on. |

|
Increase Sensor Distance
This button will increase the sensor distance by/between 2-5cm.
HOW TO:
With remote control facing/pointing towards the sensor, press once, a solid LED light comes on first and briefly followed by 3 LED light flashes. Each key press increases sensor proximity zone, and represents 2-5cm increment.
*Sensor distance range scope is around/between 7cm-35cm |

|
Decrease Sensor Distance
This button will decrease the sensor proximity distance by/between 2-5cm.
HOW TO:
With remote control facing/pointing towards the sensor, press once, a solid LED light comes on first and briefly followed by 2 LED light flashes. Each key press increases sensor proximity zone, and represents 2-5cm increment.
*Sensor distance range scope is around/between 7cm-35cm |

|
Auto Search
This button allows the 'automatic' settings of the sensor proximity sensor range.
HOW TO:
With remote control facing/pointing towards the sensor, press once, a solid LED light comes on first and briefly followed by 5 LED light flashes. During these flashes, the sensor will auto-calibrate itself and adjust its infrared distance settings in accordance with environment.
This button can also be used to set the sensor distance manually.
For example, once this button is pressed, place hand/object at desired position/distance where you want sensor range to end and it will automatically calculate the distance from sensor module to hand/object. |
 |
Standby
This button will put the sensor on standby or 'inactive' mode. This is particularly useful if the tap needs cleaning or simply trying to put the sensor tap 'out of action' during holiday period. When this mode is active, the sensor will not respond to any interaction with it until it's switched ON again.
HOW TO:
With remote control facing/pointing towards the sensor, press once, LED light comes on and stays on for 2-3 seconds and then goes off, standby mode is now active.
To disable, press once, LED light comes on and stays on for 2-3 seconds ‘twice’ and then goes off. Standby mode is now disabled. |